


Overview
A wonderful way to enjoy Minecraft is completely customizing it with modifications. These can be Forge or Fabric mods that can change the way you experience the game. Whether you’re wanting to explore brand new dimensions or have guns to easily kill hostile creatures, modifying Minecraft allows for countless possibilities. Most of the time, players may find a handful or large collection of mods to play with in singleplayer. Frequently, players want to use lots of mods at the same time to enjoy lots of unique features. This introduces modpacks, collections of modifications that are hand-picked for an incredible experience. Installing these unique packs on your launcher isn’t common knowledge, as it involves specific configuration. Keeping this in mind, we’ve created this tutorial to walk you through how to install custom modpacks client-side on Minecraft. If you want to Modded Minecraft Server and install mods, check out our server-side guide here.
Preparation

Before installing any custom modpacks in Minecraft, you’ll want to ensure all mod files are easily accessible. This includes placing them into a single folder for you to quickly access them for the installation. For example, if you’ve downloaded some online or using the “mods” folder from an existing modpack, make sure to keep track of them for later. However, people who’ve used the Modpack Creation Addon to have us create a pack can download the necessary files from the Dropbox link via the ticket. Once everything is prepared on your computer, you’re ready to install the mods to Minecraft.
Default Launcher Setup
The classic way of setting up custom modpacks is using the vanilla Minecraft launcher. This is what many players do, but involves prior configuration due to mods requiring Forge or Fabric depending on their design. When you’re ready to add the mods, it’s extremely easy and doesn’t take too much time. Review the sections below to begin using your custom modpack.
Installing Minecraft Forge
If you’re wanting to use Forge mods, then make sure to install it on your launcher.
- Navigate to Forge’s website and locate your desired version.

- Once found, select it and press Installer for the
LatestorRecommendedbuilds.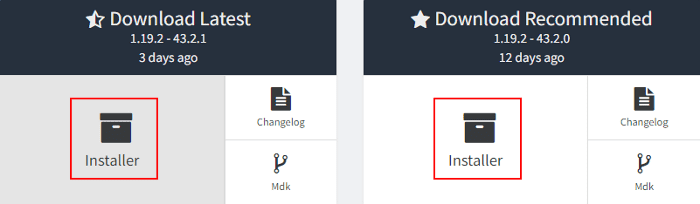
- Save the file somewhere easily accessible, then run it to begin installing it.
Note: For more information about this process, visit our dedicated guide.Installing Minecraft Fabric
Mods that use Fabric require that on the launcher, which is done down below.
- Navigate to Fabric’s Download page, then select the universal jar.

- Save this file somewhere easily accessible on your computer.
- Afterward, open it up to begin the
clientinstallation.
Note: For more information about this, visit our dedicated tutorial.Adding the Mods
Once you have Forge or Fabric installed, continue to follow the steps below to add the mods.
- Open your Minecraft Launcher, then click on
Installationsat the top.
- Once there, locate your installed modded profile and select its
Foldericon.
- In the newly opened window, enter the
modsfolder.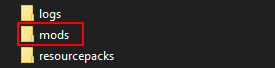
Note: If you cannot find this folder, then create it before proceeding.
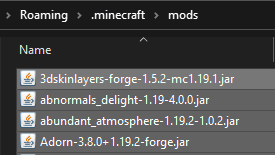
- Afterward, drag and drop your mod JAR files into this area.
- Return to the launcher and
Playon the modded profile to load the custom modpack.Occasionally, some players may try to install custom modpacks that involve extra files. For example, there is a “config” folder that may contain lots of configurations for your mods. Similar files have to be uploaded in the main directory of the Minecraft launcher. In other words, they’re supposed to be outside of the “mods” folder.
CurseForge Launcher Setup
Instead of using the default Minecraft launcher to manage your custom modpack, you can use CurseForge to have multiple instances of packs to enjoy. This is the most popular option to use for them, as it can have both Forge and Fabric types. Its user-interface is friendly and allows you to smoothly keep track of all your modded Minecraft profiles. We’ll be going through the needed steps to create a custom modpack with this launcher in the below sections.
Installing CurseForge
- Head towards CurseForge’s Download page.
- Locate your computer’s operating system, then press Download.

- Save this file somewhere easily accessible on your device.
- Open it to begin the installation process for the launcher.
Creating a Custom Profile
Making profiles for each of your custom modpacks will give you dedicated areas to make any changes to them. It’s extremely easy to set up, as it only takes a few minutes.
- Start the CurseForge launcher, then click
Create Custom ProfileinMy Modpacks.
- Enter a
Profile Nameand continue to select theMinecraft Version, thenGame Type.
Note: You can change the exact Forge or Fabric build in the
Modloader Version.- Once everything is filled out, proceed to
Createthe profile at the bottom right.
- Wait for the profile to completely finish loading the required files.
Uploading the Mods
Similarly to adding mods on the default launcher, you’ll need to access the “mods” folder. However, this is now stored in your custom profile’s directory and is straightforward to reach.
- In the
My Modpackssection of the launcher, locate and select your Custom Profile. - Continue to press the
three vertical dotsand clickOpen Folderin the option list.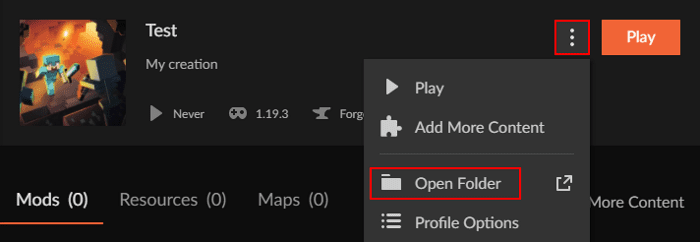
- In the newly opened window, open the
modsfolder.
- Proceed to drag and drop your desired mod JAR files in this area.
- Afterward, return to the launcher and click
Playto the right of the profile.Common Issues
Mods Aren’t WorkingIf your mods aren’t working at all, then ensure you’ve installed them properly. Double check that they’re inside the “mods” folder in your Minecraft launcher directory, or inside your custom CurseForge profile. After confirming this and it’s still failing, then make sure the mods are compatible with your game version. For example, 1.12.2 mods cannot work with 1.16.5 types of it. Additionally, you’ll only be able to run Forge or Fabric instances. Once the compatibility is sorted out, everything should begin working. However, occasionally mods will not work regardless of double checking their compatibility. This is due to either missing dependencies or incompatibility by design (conflict between mods).
Lagging Too MuchIn cases where you’ve successfully installed the custom modpack and you get lag in-game, then try allocating more RAM. This means you’ll be allowing extra memory to your Minecraft launcher so the mods can load and perform better. Doing this will likely resolve all issues, but you may have to review our modded optimization guide to see what other troubleshooting solutions to try. For example, installing a performance modification to your client tends to help with FPS. Sometimes, the entire launcher will crash if the lag isn’t managed.
Minecraft Modpack FAQ: Custom Modpacks, Forge & Fabric
How do I install a custom Minecraft modpack with Forge or Fabric?
First, install the appropriate modloader (Forge or Fabric) for your modpack. Create a new profile in your Minecraft launcher, open its “mods” folder, and drag all the mod .jar files into it. If the modpack includes “config” or “scripts” folders, place them in the main directory of your profile.
Can I use both Forge and Fabric mods in the same Minecraft instance?
Generally, no. Forge and Fabric are different modding platforms, and their mods are not compatible with each other. While experimental tools like Patchwork exist to bridge them, they are not officially supported and may not work reliably.
How do I install a custom modpack using CurseForge?
In the CurseForge Launcher, navigate to “My Modpacks” and select “Create Custom Profile.” Set your desired Minecraft version and modloader (Forge or Fabric). Once the profile is created, open its “mods” folder, add your mod files, and launch the game from the profile.
Why aren’t my Minecraft mods working after installation?
First, ensure your mods match your Minecraft and modloader version and are in the correct “mods” folder. Also, check that you have installed all required dependency mods and are launching the correct game profile. If issues persist, there might be a conflict between two or more mods.
What folder do I put Minecraft mods into?
Mod .jar files should be placed in the “mods” folder within your Minecraft installation or CurseForge profile directory. If this folder does not exist, you can create it manually. Any accompanying configuration files usually go in the root folder of the modpack.
How do I create a custom profile in CurseForge?
Open the CurseForge app, go to the “My Modpacks” section, and click “Create Custom Profile.” Give your profile a name, choose the game version and modloader, and then you can add mods to its “mods” folder.
Why is my Minecraft modpack lagging so much?
Modpacks can be resource-intensive. To improve performance, try allocating more RAM to Minecraft, removing any non-essential mods, or installing performance-enhancing mods like OptiFine or Sodium. You can also lower the in-game video settings. Persistent lag may indicate a mod conflict.
Do I need to install Forge for every Minecraft modpack?
Yes, each modpack requires its own specific version of Forge or Fabric. You will need to install the correct modloader version for each modpack you play, even if you already have a different version of Forge or Fabric installed.
How can I allocate more RAM to Minecraft modpacks?
You can increase the RAM allocation in the settings of your Minecraft or CurseForge launcher. Look for the Java arguments or memory settings and increase the maximum RAM value (e.g., -Xmx4G for 4GB). Do not allocate more RAM than your system can comfortably handle.
What should I do if mods require extra files like configs or scripts?
If your modpack comes with additional folders such as “config” or “scripts,” place them in the root directory of your Minecraft or CurseForge profile. These files should not be placed inside the “mods” folder.

Latest Updates
Game Specific Updates
- In the newly opened window, open the
- Enter a
- Once there, locate your installed modded profile and select its
- Once found, select it and press Installer for the


