


Overview
As more and more Minecraft versions are released, the pool of potential server versions will only grow. While many server owners will aim to run the latest version, there are exceptions to this that will often occur. Running mods, waiting for plugin updates, or simply desiring an older experience are all valid reasons for running different server versions. This can cause confusion at times, as the Minecraft Java Edition launcher will always provide the latest release by default, leading to connection errors on older versions. Thankfully, this is easily solved with the Installations feature on the launcher, allowing players to create and edit Minecraft installations with whichever version they prefer. Whether it’s to run Minecraft Forge or just for a different experience, changing the version is very easy. To help you get started, we have created this Apex Hosting tutorial to guide you through the necessary steps.
Creating a New Installation
- Open the Minecraft Java Edition launcher.
- At the top of the application, navigate to
Installations.
- Following this, press
New Installation. - Select an icon and name for the installation.

- Open the
Versiondropdown and select the desired version.
- Once all settings have been selected, press
Create.
After this, you will be returned to the Installations tab where you can view all existing versions, including your newly created one. If you wish to get started immediately, hover over your installation and press Play.
Managing Installations
In some cases, you may wish to manage or edit installations later on, which is also available. When on the Installations page, there will be several options available for you to choose from.
Search and Sorting
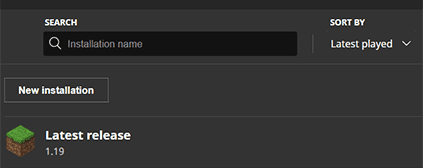
Near the top of the page will be the search bar and the sort function. This will allow you to either find the desired installation by text or change the sorting order.
Version Filters

Next to these search features are the version filters. Here you can choose which versions will appear in the list, allowing you to easily hide unnecessary installations during your search.
Open Directory

When hovering over a version, you may notice various buttons available for use. One of these buttons is the “Open Directory” function. By pressing this, it will immediately open a file explorer to the installation files. This is helpful when installing mods or if you use a different installation path for some versions.
More Options
Another button available in the hover menu will allow you to either edit, duplicate, or delete a version. Editing will allow you to change the profile similar to creating a new one, duplicate will clone the profile, and deleting will remove it altogether. Only player-created installations can be deleted, so default versions such as the Latest Release will always be present.

Changing Versions

After creating a new installation, it can also be found in the default Play page within the launcher. To change the version, simply open the dropdown menu to the left of the Play button, then select your new version from there. When you are ready, press Play to install any necessary files and begin the game.
Conclusion
When there are so many server versions to choose from, understanding how to match that version is of the utmost importance. Some servers may use ViaVersion, which allows players to join from a variety of different game versions. When this is not available, players can only join a server when they are running the exact same version on their own device. When making new installations, we recommend giving them a unique or memorable name, allowing you to easily distinguish one from the others. In addition to the basic settings, you can do even more with an installation, such as allocating more ram, adjusting the resolution and more. With this knowledge in your arsenal, you are ready to explore a variety of Minecraft versions and jump right into the action.
Helpful Links
How to Allocate More RAM to a Launcher
How to Install Forge (Client Side)
ViaVersion Plugin


