


Overview
Whether you enjoy exploration, building, or anything in between, a Minecraft world is your canvas. This is brought to the next level with servers, which allow you and other players to work with or against each other in the same world. While this is fun, many server owners prefer to use an existing world rather than starting fresh. Thankfully, worlds can be uploaded and used on your server at any time. This can be used to continue your singleplayer saves or use a map created by someone else. Worlds can easily be swapped at any time on our panel, however it can be a bit tricky to upload a Java world for those that are unfamiliar with the process. With this in mind, we have created this Apex Hosting tutorial to help you get started.
Downloading a World Online
If your goal is to upload a previously-created map from online, we highly recommend only using an official site such as PlanetMinecraft or CurseForge as they are trustworthy compared to alternative platforms. When searching for a world, ensure you select one that matches the version of Minecraft you wish to play.
- From your chosen site, save the world file to a safe location on your computer.

- If zipped, we recommend extracting it with a program like 7-ZIP or WinRar.
- Find the extracted world folder and rename it to be easily identifiable without special characters.

E.g. Change
$_MyWorld_$to justMyWorld. - Once done, zip the world file once again to prepare it for the upload process.
Finding a Singleplayer World
In other cases, you may wish to upload a singleplayer world directly from your own game. These are easy to find regardless of your operating system with the Minecraft launcher.
- Open your Minecraft launcher, then press “Installations” at the top.
- Highlight your version profile, then click the “Open Folder” icon to the far-right.

- In the new window, locate and enter the “Saves” folder.
- Find the singleplayer world that you wish to use.

- (Optional) Rename the folder so it is easily-identifiable later on.
- Using a program like 7-ZIP or WinRar, zip your world folder.

- Keep this window open, as it will be needed shortly.
Uploading to the Server
When uploading large files to a server, we highly recommend using an external FTP program such as Filezilla. These will ensure transfer speeds are increased while minimizing the chances of a failed upload.
- Navigate to your Apex server panel, then stop the server.
- Connect to your server through an external FTP program.
- If enabled, enter your server profile folder to find the main directory.

- Upload the world .zip file from earlier until it is fully uploaded.

⚠️ If your world is smaller, then you can try uploading it into the FTP File Access panel via drag + drop.
Unzipping the File
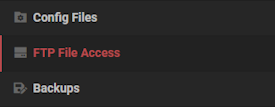
- Return to your Apex panel, then enter the “FTP File Access” on the left-hand side.
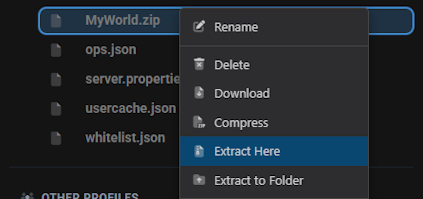
- Once logged in, find your uploaded .zip file, then right-click it.
- Press “Extract Here” in the file option list and wait for it to finish.
- Once completed, verify it’s been unzipped properly and confirm the folder name.
- After all of this is completed, you are now ready to load up your world on the server for use!
Loading the World Server-Side
- Return to the main panel page and ensure the server is still offline.
- Scroll down to the “World” section and press the accompanying “Change World” button.

- In the prompt, enter the exact folder name for your world, case-sensitive.

- Afterwards, choose to restart the server to load up the new world.
Common Issues
In most cases, this means that the world was not properly changed or the server did not restart. Return to the World section and follow the steps again to ensure you change the name of the world to match your uploaded world folder. Once this is done, confirm that the server is properly restarting by checking the Console tab, which should allow your new world to generate.
Oftentimes, this issue can occur through multiple reasons during the upload and loading process. First, verify that the world folder is uploaded into the main server directory and that the folder itself contains the level.dat file. If the world is uploaded into any other location or is within a sub-folder, it will not work. Additionally, if you are using server profiles, ensure you are entering the correct profile before uploading the world.
If this occurs, there may be an issue with the upload process or the world itself. Keep in mind that the server should match the version of the world you are attempting to use. If you are using a newer world on an older server version, you may receive a crash upon startup. Additionally, we highly recommend only uploading .zip files for your world rather than an entire folder. This will transfer all files at once instead of potentially encountering errors on each individual world file. Once this is solved, continue loading the world as normal and restart the server.
Helpful Links
PlanetMinecraft Maps
CurseForge Maps
How to Connect with FTP


