Overview
Hosting Minecraft servers opens the doorway for potential issues, such as griefers and thieves. This can lead some owners to search for solutions, such as chest protection. This possible feature can prevent other players from stealing or destroying valuable items. Luckily, LocketteX has this exact functionality, made available to Paper, Spigot, and other Bukkit servers. Using this in-game is an easy task, as it only requires a sign to protect your chest. It’ll automatically assign the player to the container, rejecting anyone else attempting to access it. However, it’s possible to have multiple users on a protected chest. There are lots of settings to tweak, personalizing its features to your liking. Keeping this in mind, let’s learn how to install and use the LocketteX plugin on your Minecraft server in this Apex Hosting tutorial.
Summary
LocketteX released in 2019 on Spigot by Valentina_pro, which gathered over 19,000 downloads. Server owners can use this on Minecraft 1.12 to 1.19 versions, making it widely available. This is a popular chest protection plugin, offering a simplistic way to configure and claim them. There are hardly any commands to use, as the main functionality is controlled by signs. These are placed on chests and require specific formatting to initiate the protection feature. Additionally, there are settings to tweak that’ll support GriefPrevention and other plugins, such as economy-based ones.
Modbox Installation
IMPORTANT: Make sure to have Spigot or Paper selected in the Game File option on your server panel so plugins can work properly.
- Head towards your Apex server panel for the server.
- Navigate to
Server Configuration > Modboxon the left.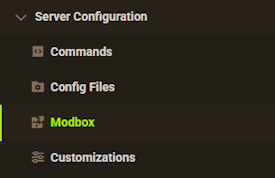
- Choose the version and search for the plugin you want, then select it.
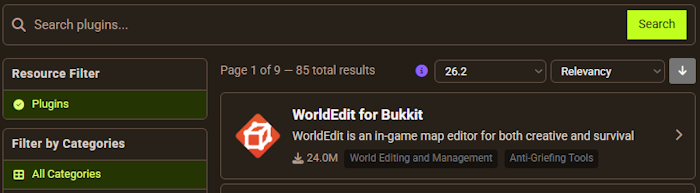
- Click
Installon the left and wait for it to be installed. - Restart the server to load the plugin. Repeat this process for any other plugins.
Manual Installation
Download LocketteX on Bukkit or Spigot and follow these steps:
- Download the plugin file from the link above.
- Head towards your Apex server panel for the server.
- Locate the Game File option, then select Spigot or Paper if you haven't already.
- Navigate to
File Management > FTP File Accessand login. - Drag + drop the .jar file in the
pluginsdirectory. Alternative: Click theUploadbutton and select the file. - Wait for this to finish, then return to the main panel.
- Restart the server and the plugin should load properly once you join.
How to Use LocketteX

Using LocketteX on your Minecraft server requires configuration before actual usage. This is due to the default settings possibly preventing protection on your world. Once everything is set and saved, you may start protecting your chests or other blocks if configured. It’s really simple compared to many other alternatives on Spigot, making this ideal for any type of Minecraft server. As one last note, there is hopper prevention to protect your chests from sneaky looters. With this said, let’s learn how to configure and use the LocketteX plugin.
Configuration
Before using the plugin’s features, you must configure its file to make it work properly. In rare cases, this isn’t required if the world’s name was “world”. This is due to the default options from LocketteX, but if you have multiple maps, then it’ll be necessary to tweak the settings.
- Head towards the FTP File Access area from your server panel.
- Login with your password and enter in the plugins directory.
- Locate and enter the LocketteX folder, then press Edit to the right of the
config.ymlfile.
- Inside of this file, change the
enabled-worldsvalues to match your current one.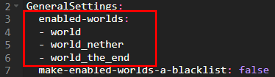
- Additionally, edit the
%owner%#%uuid%to%owner%at the bottom of the file.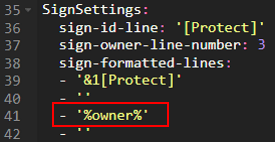
- Proceed to tweak anything else you want, then press Save at the top.
- Return the main panel and Restart the server, or use
/lockettex reloadin-game.
Protecting Chests
- Join your Minecraft server and locate the desired chest to protect.
- Once found, craft a sign and shift + right-click the chest while holding it.
- Proceed to enter [Protect] or your custom
sign-id-linevalue from the configuration file.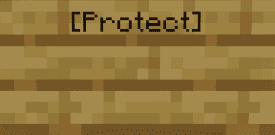
- After typing this on the first line, press Done at the bottom.
- Your chest is now protected, but you can confirm via the chat message.

Commands
By default, there shouldn’t be a need to set up permissions. However, if it’s required, then use a plugin like LuckPerms to manage them. Otherwise, become a server operator to use all commands. Review the list down below to learn what can be used in-game.
| Command | Permission | Description |
|---|---|---|
| /lockettex reload | lockettex.admin | Reloads the configuration file into the server, applying recent changes. |
| /lockettex add | lockettex.create | Ability to add multiple players to a protected chest. |
| /lockettex remove | lockettex.create | Ability to remove users from a protected container. |
| N/A | lockettex.create | Ability to create protect signs. |
Common Issues
Plugin Isn’t Working
If LocketteX appears as red or doesn’t show after using /plugins in-game, then it’s disabled. You’ll want to double-check if your server’s version supports the plugin’s one. Remember, only Minecraft 1.12 to 1.19 can use this on servers. If this checks out, then it could be installed on the wrong server profile. This is when you have multiple instances of a server on a single panel, so make sure it’s uploaded in the right one.
Unable to Save File Changes
When accessing and editing the config.yml file, make sure to be following the setting formats. If you make and save an invalid option, then it’ll appear as if nothing happened. Once the issue is corrected, re-save the file and it should work as intended. However, in rare events the problem may arise from not reloading LocketteX or restarting the server. Make sure to be using the /lockettex reload command in-game or Restart from the main panel.
Useful Links
LocketteX on Spigot
How to Add Plugins to Minecraft Servers
How to Become a Server Operator