Biomes O’ Plenty adds dozens of new biomes to the Overworld and Nether, including new trees, plants, and blocks. It requires Forge and, for version 1.18 and above, the TerraBlender library mod. This guide covers how to download and install the mod on a server and client, configure the world type, and fix common issues.
Downloading Biomes O’ Plenty
Before installing the mod, Forge must be installed. See how to install Minecraft Forge client-side for setup steps.
- Go to Biomes O’ Plenty on CurseForge and click the Files tab near the top.
- Locate the latest version of the mod for the Minecraft version being used.
- Press Download and save the file.
- If using Minecraft 1.18 or higher, also download TerraBlender from CurseForge and save it alongside the BOP file.
Client Installation
- Open the Windows search bar and type
%appdata%, then press Enter. - Open the .minecraft folder, then open the mods folder inside it.
- Drop the Biomes O’ Plenty
.jarfile (and TerraBlender if applicable) into the mods folder. - Close the folder and reopen the Minecraft launcher.
- Select the Forge profile and launch the game.
Server Installation
- Open the Apex server panel and stop the server.
- Click FTP File Access on the left and log in.
- Open the mods folder.
- Click Upload and drag the Biomes O’ Plenty file (and TerraBlender if applicable) into the upload area.
- Wait for the upload to reach 100%, then return to the main panel and start the server.
How to Enable Biomes O’ Plenty on a Server
After installing the mod, the world type must be set to use BOP biomes. The configuration steps differ by game version.
For Minecraft 1.18 and above: No additional configuration is required. The mod generates BOP biomes automatically.
For Minecraft 1.15 and above (up to 1.17):
- Open the Apex server panel and stop the server.
- Click Config Files on the left, then open Server Settings.
- Set the
level-typefield tobiomesoplenty. - Save and restart the server.
For Minecraft 1.12.2 and below:
- Open the Apex server panel and stop the server.
- Click Config Files on the left, then open Server Settings.
- Set the
level-typefield toBIOMESOP. - Save and restart the server.
Modbox Installation
As an alternative to the manual installation, you can install Biomes O’ Plenty on your server using Modbox, our built-in mod browser with direct CurseForge integration.
- Log in to your Apex Hosting account and open your Minecraft server panel.
- On the left side, select
Server Configuration > Modbox.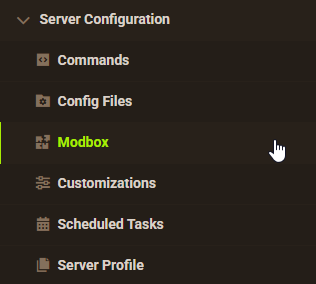
- Search for the mod you want and open its mod page.

- Select the recommended version for your server, then click
Install.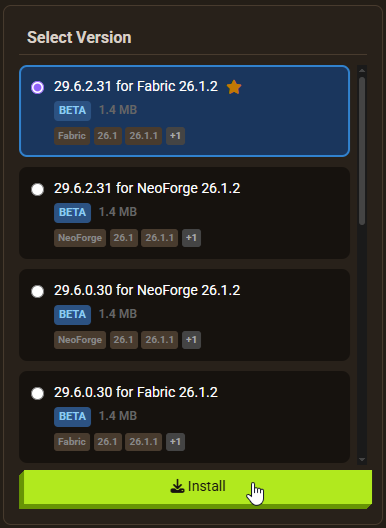
Note: Modbox automatically matches mods to your server's installed version, but does not install dependencies automatically. For more details on using Modbox, check out our full Modbox guide.
If your server runs Minecraft 1.18 or above, Biomes O’ Plenty requires the TerraBlender dependency mod. Search for and install it individually through Modbox using the steps above, before installing Biomes O’ Plenty itself. If you’re on Minecraft 1.17 or below, no dependency is required, but you’ll still need to set the level-type in Config Files as covered in the section below, regardless of which installation method you use.
Biome Examples
Biomes O’ Plenty covers a wide range of environments, from tropical and autumnal forests to volcanic wastelands and crystal-clear lakes. The screenshots below show a sample of the new biomes added to the game.


Common Issues
A crash at startup is usually caused by a duplicate mod file, a missing dependency, or an incorrect mod version. Check the server console for an error message identifying the problem. Biomes O’ Plenty has no required dependencies beyond TerraBlender for 1.18 and above.
When mods are added or removed, the server may pause and require confirmation before fully starting. If the console shows missing mod ID errors, enter /fml confirm in the server console to allow the server to continue.
A “Duplicate Mods” error in the console means two copies of the same mod are present in the mods folder. Open FTP File Access, navigate to the mods folder, and remove the extra copy.
A missing dependency error identifies the required mod by name in the console message. Download the missing mod from CurseForge and upload it to the mods folder, then restart the server.
If the mod was downloaded for a different version of Forge than the one installed, the console will show a version mismatch error. Download the correct version of the mod for the installed Forge version and replace the old file.
Conclusion
Biomes O’ Plenty expands Minecraft world generation with a large set of new biomes for both the Overworld and Nether. Installing it requires Forge, the mod file, and a level-type configuration change for servers on 1.17 and below. For help changing the server version before installing, see how to change your Minecraft server version.