


Overview
On a variety of servers, you may notice that each player is given a set of ranks, whether they are static, or you gain new ones. These ranks can be configured with custom permissions, allowing a difference between staff members or normal players. In order to achieve this yourself, you will need a permissions plugin such as PEX (PermissionsEX). Whether creating the ranks through the file directly or using the in-game commands, you can completely customize each rank to have different abilities. With Apex Hosting, installing PEX is very easy, so today we’ll show you how to install the plugin and get your first few ranks.
Keep in mind, in order for prefixes/suffixes to appear in the chat, you will require Vault and a chat plugin such as EssentialsX.
Modbox Installation
IMPORTANT: Make sure to have Spigot or Paper selected in the Game File option on your server panel so plugins can work properly.
- Head towards your Apex server panel for the server.
- Navigate to
Server Configuration > Modboxon the left.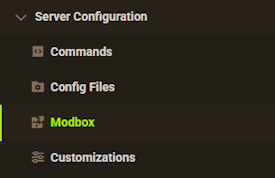
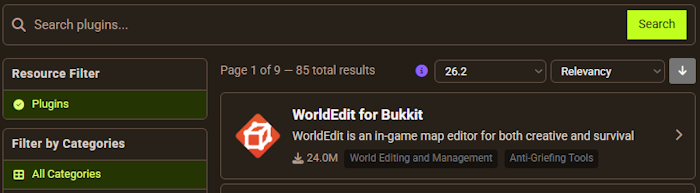
- Choose the version and search for the plugin you want, then select it.
- Click
Installon the left and wait for it to be installed. - Restart the server to load the plugin. Repeat this process for any other plugins.
Manual Installation
Download PermissionsEx and follow these steps:
- Download the plugin file from the link above.
- Head towards your Apex server panel for the server.
- Locate the Game File option, then select Spigot or Paper if you haven't already.
- Navigate to
File Management > FTP File Accessand login. - Drag + drop the .jar file in the
pluginsdirectory. Alternative: Click theUploadbutton and select the file. - Wait for this to finish, then return to the main panel.
- Restart the server and the plugin should load properly once you join.
How to Get Started with Commands:
Once PermissionsEX is loaded up, we can now get started with a few ranks. Access to the console is required for these first commands. When using the console, exclude the “/”, so “/pex” will be entered as “pex”.
Creating Your First Rank:
We will first start by creating an Admin rank to use commands in-game.
- In the console, use the command pex group Admin create.
- Once created, use pex group Admin add permissions.* to give all permissions to that rank.
- Now, perform pex user [YourPlayerName] group set Admin to add yourself. (e.g. pex user Apex_Daltondorf group set Admin)

Customizing the Ranks:
You have now given yourself all admin commands to be used in-game! There are a few other commands that can be used to further customize the rank:

- Using the command pex group Admin set rank 1, our Admin rank is now the most important. E.g. If creating a Moderator rank, you may want to set the rank to 100, as it is less important.
- Performing pex group Admin prefix “&0(&4Admin&0)&7 “ will set a prefix to appear before chat, if Vault and a chat plugin like EssentialsX is present. You can see how this looks above.
- Similar to adding all permissions, you can customize each rank’s abilities with other plugin permissions. If we have a Mod group and want to add flight from EssentialsX, we could use pex group Mod add essentials.fly.
Each of these commands can be used across a variety of groups, so you can create individual groups with customized permissions.
How to Get Started with the Config File:
Some players prefer to edit the file directly, whether to see the exact changes or if the commands are not working as expected. Please keep in mind, this is for more advanced users.
Locating Config File Directly:
- Stop the server, then navigate to the
FTP File Accesson the left - Access the
pluginsfolder, thenPermissionsEx. - Now press
editto the far-right of the permissions.yml file.
Editing the Config File:
Before making any changes to the file, we recommend copy-and-pasting the existing text to a Notepad for a backup.

If looking at the unedited file, only the default group will be present. We recommend copy-and-pasting the default group below itself, to make formatting easy. For example, here is an Admin group:
groups:
  Admin:
    permissions:
    - permissions.*
    options:
      rank: '1'
      prefix: '&0(&4Admin&0)&7 '
It may look confusing, so we’ll break down the parts of it to get a better understanding.
Admin:
The name of the group, this can be renamed to anything you desire.
permissions:
The permissions section is what each rank has. In this example, they have permissions.*, giving them every command.
rank:
The order of importance for the group. The lower the number, the more important.
prefix:
The prefix given to players in the chat, which appears next to their name

Once you have the necessary group added, we also recommend adding yourself to the group to give all commands. You can add this example to the bottom, but make sure to check that the formatting matches:
users:
  YourPlayerName:
    group:
    - Admin
    permissions:
    - permissions.*
Simply replace “YourPlayerName” with your own username or UUID, then you can save the file and restart the server!
How to Proceed After:

After creating your first rank, you should now have access to all PEX commands in-game, allowing you to create as many ranks as you desire. We recommend creating an additional Member, VIP, and Mod group, although you can create as many as you wish.
For more in-depth information on the PEX plugin, all information can be found on their official documentation.
Notable Plugin Commands:
PEX has a large variety of commands, so we will provide the important user and group commands. For a full list, consider visiting their official wiki page.
/pex user  - Checks user data
/pex reload - Reloads pex configurations
/pex user  prefix [prefix] - Sets a users prefix
/pex user  suffix [suffix] - Sets a users suffix
/pex user  list - List the permissions for the user
/pex user  add  - Adds permissions to a user
/pex user  remove  - Removes permission from a user
/pex user  group list - List the groups the user is currently in
/pex user  group add  - Adds a group to the user
/pex user  group set  - Sets the users groups. This will remove the user from any other group that they are a member in.
/pex user  group remove  - Removes user from a group
/pex group - List all groups
/pex group  prefix [prefix] - Sets the prefix for a group
/pex group  suffix [suffix] - Sets the suffix for a group
/pex group  create - Creates a group
/pex group  delete - Deletes a group
/pex group  parents list - List the parent group(s)
/pex group  parents set  - Set the parent(s) for the group
/pex group  - List all the permissions for the group
/pex group  add  - Adds permissions to the group
/pex group  remove  - Removes permissions from the group.
/pex group  users - List all users in a group
/pex group  user add  - Adds a user to the group
/pex group  user remove  - Removes user from the group
Conclusion:
PermissionsEx is an excellent way to add ranks and permissions to your Minecraft Server. With this plugin, you can create a hierarchy on your server, add ranks specifically for donors, set people to administrators, and much more. Permissions and groups are one of the hardest parts of developing a Minecraft server. However, as long as you get the general format down for configuring groups/permissions you should be able to do it with ease.
Make sure that when you are configuring this plugin, you are extra careful that you use the correct format as shown in this tutorial. Failure to do so can cause the plugin not to work.
Common Issues:
My plugin commands aren’t working:
Oftentimes, this is an issue with either the server version or the uploaded plugin. Ensure the server is on a plugin-compatible version, such as Spigot or Paper. If the issue is still occurring, make sure the .jar file is in the plugins folder. If anywhere else, it will not work.
The permissions aren’t working after editing the file:
Oftentimes, this means there is an issue with the file formatting causing it to not work. We recommend using a YAML validator and pasting the entire config into it to check for errors. You can edit the config directly through the website until it’s correct, then paste it back into the panel editor.
Prefixes aren’t appearing in the chat:
The main cause for this is not having the required plugins to have them appear. Ensure that the Vault plugin is added, as well as EssentialsX. If the EssentialsXChat is not included, ensure you add that as well. Once these are added, the prefixes should appear normally after a restart!


