


Overview
Hosting a Minecraft server has many benefits, such as the ability to completely control and customize the gameplay experience. However, dedicated hardware costs money to manage and use. This can be occasionally difficult at times, as some server owners may have financial issues or concerns. Fortunately, there’s a method for you to make money with it, while providing extra content for your players. Introducing Tebex, a piece of software that allows you to make a webstore for your server. Whether you want to sell powerful items or ranks, there’s many possibilities. Setting this up can be complicated, which is why our system has this software built-in for your convenience. This automatically configures everything, but there’s still other steps needed to personalize your webstore. This can cause some confusion, especially if you’re new to selling goods with this software. Due to this, we’ll show you how to set up Tebex and the webstore for your soon-to-be monetized Minecraft server in this Apex Hosting guide.
Tebex Benefits

There’s many benefits for using Tebex on your server, with making money being the main one. Other kinds include having a dedicated website and area for your players to use, along with other features to help connect your community together. Our automated system only supports Tebex for Minecraft, but may become available on other games in the future. Once you’ve connected this software to the server, you can begin creating your webstore and packages to sell. Keep in mind that you’re also given the ability to make many pages, add sidebars, integrate Discord, and other features to the website. If you have a custom domain, then you can implement that too so everything is personalized for your community. This also makes your Minecraft server more professional, as you can have in-game information, tutorials, or anything else on the website. In other words, Tebex offers you a chance to monetize and enhance your community with almost endless possibilities.
Initial Setup
Before creating your own webstore for the game server, you’ll need to automatically install Tebex through the panel. This process is straightforward and easy to accomplish, which is shown in the instructions down below. After installing Tebex on your Minecraft server, you’ll be sent an email with directions to finish creating your account with their service. Keep in mind that you’ll need to triple check the information used for this setup, as a typo can result in not being able to receive further details.
- Head towards your Apex server panel, then click
Monetizationat the bottom left corner.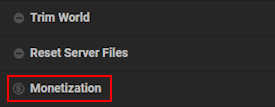
- Proceed to fill out your
First Name,Last Name, andEmail Addressin the fields.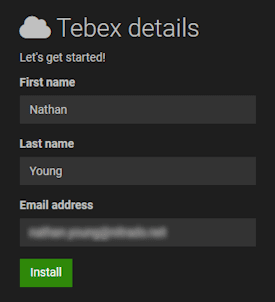
- Afterward, press the
Installbutton and confirm your information in the next prompt.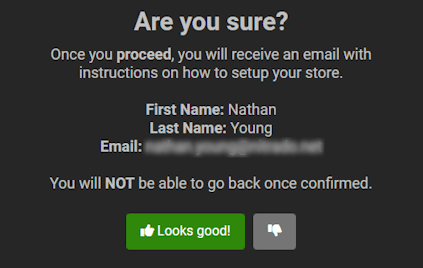
- Once you’re finished, check your email’s inbox for “Setup your Tebex account”.
- While viewing it, click the
Setup Accountbutton to get started.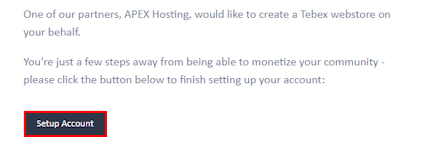
- On the next page, enter your
Passwordin the text boxes and clickSetup Account.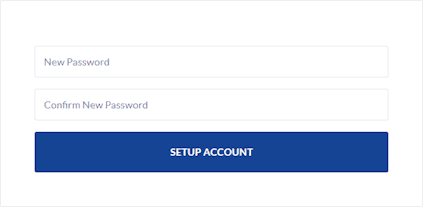
- When you’re done, the Tebex account is now registered and linked to your game server.
Customizing the Webstore
There’s lots to do with your Tebex webstore, such as making new pages for community guidelines, custom sidebars to help reach server goals, create items to sell, among other features. All of this is accessible through your Tebex Dashboard, which may be confusing at first. With this in mind, we’ve created many step-by-step instructions for you to easily understand how to use this software. Review the information below to get started with Tebex.
Creating Store Items
Before creating packages to sell in your webstore, you’ll want to understand some important details. These include the basics of making an item and tweaking it accordingly, such as making it a subscription or limiting how many times the user can purchase it. Additionally, it’s best to set up categories for these packages, like having “Ranks” or anything else you want. This makes it easier for players to navigate through the webstore and begin buying items. The chart and subsections below will help you through this process.
| Setting / Option | Description |
|---|---|
| Name | This is the package’s name displayed in-game and on the website. |
| Description | This is an overview of what the player will receive upon purchasing the package. |
| Price | Determines how much the player must pay for this package. |
| Recurring Payment | Choose how the player pays, such as one-time or through a subscription. |
| Global Limit | Restrict how many times this package can be bought on your webstore and game server. |
| User Limit | Restrict how many times the buyer can purchase this package for their account. |
| Required Packages | Determine if another package is required before purchasing this other one. |
| Visibility | Set when this package is published, removed, and who can see it on the webstore. |
| Variables | Create and select a variable for external options, such as granting the buyer a role in Discord servers. |
| Upselling | Choose strategies like alternative packages or additional ones to “upsell” the buyer into purchasing more items. |
Categories
- Head towards your
Dashboardand clickPackagesnear the top left corner.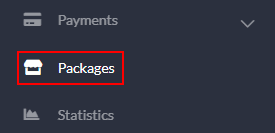
- Continue to press
Add Newat the top right and select theCategoryoption.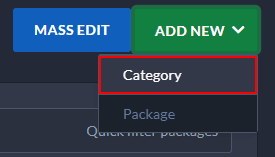
- Type your desired
NameandDescription, then tweak other settings down below.
- After you’re finished, click the
Createbutton at the bottom to save these changes.
- If successful, you’ll see “Category successfully created” appear down below.
Packages
- Navigate to the
Dashboardand clickPackageson the left of this page. - Under your empty category, press
Create Oneto begin making the item.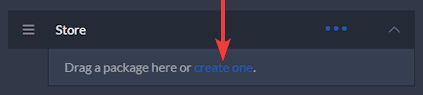
- Continue to enter the
NameandDescriptionfor this package, along with other options.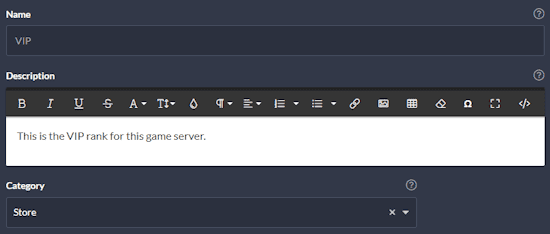
- Proceed to type your desired
Priceand configure other settings until you’re satisfied.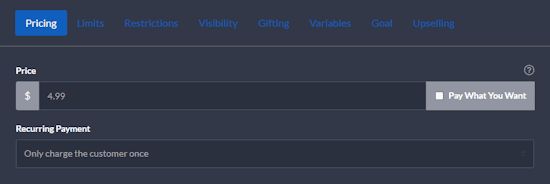
- Scroll down and click
Game Server Commandsto finish the rest of this process.
- Afterward, select your server from the
Game Serversoption. - Once you’ve done this, press
Add Commandto the right and enter your commands.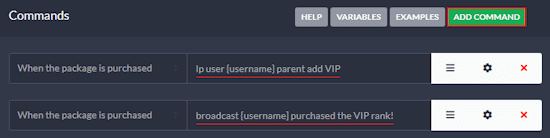
Note: Click
VariablesorExamplesfor additional command information.
New Pages
If you’re wanting to make custom pages for your players to visit, then follow along below. This gives you the ability to establish game rules, advertise your Discord server, and anything else you may have in mind. Remember, Tebex doesn’t only offer the means to sell goods, as it’s providing you a service to host a complete website for your community. We strongly recommend making a few pages to personalize your store.
- Navigate towards your
Dashboard, then clickWebstoreto the left and press Pages.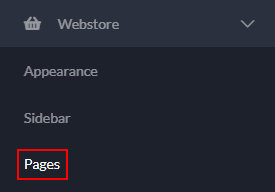
- Afterward, click the
Create Custom Pagebutton near the top right corner.
- Proceed to enter your desired information, such as a
Title,Slug, andContent.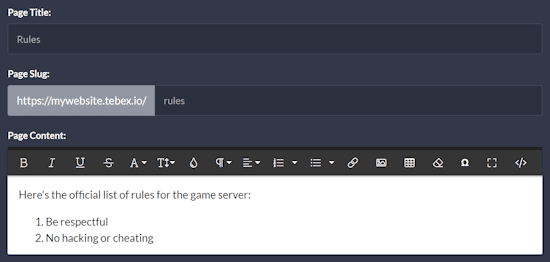
- Once you’re finished, continue to press the
Createbutton at the bottom left corner. - If successful, “Page successfully created” will appear down below.
The
Pagesarea for your webstore is also where you can tweak theHomepage. This is done by clicking Edit at the top and typing your desired content for it via the editor. When you’re finished, make sure to pressUpdateand review the changes. Keep in mind that it may take a few minutes for the new edits to appear on the webstore.
Custom Sidebars
Another way to add extra content on the website is to use sidebars, which are almost always available to view. This might be the best way to include feature packages, support links, Discord servers, or anything else you need to display. The instructions below show you how to accomplish this goal.
- While on your
Dashboard, clickWebstoreand pressSidebaron the left-hand side.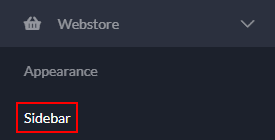
- Afterward, click the
Add Module to Sidebarbutton at the top right corner of this page.
- Locate your desired module, then press
Createon it to begin the process.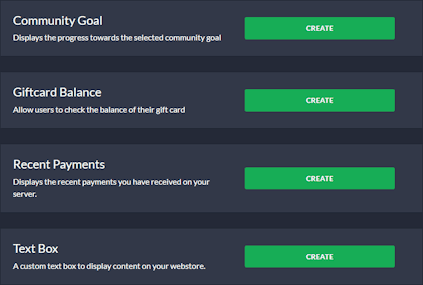
- Proceed to type or toggle content you want, then click
Createat the bottom.
Note: Every module is unique, giving you different options or fields for each one. - If successful, you’ll see “Module successfully created” down below on the page.
Other Customizations
There’s plenty of other features to try out with Tebex, such as connecting a domain, setting up website themes, integrating Discord with the software, creating discount sales, or banning specific customers. Most of these are straightforward, as they’re all accessible from the main Dashboard. For example, clicking “Discord” reveals the ability to invite the Tebex Bot to your server so extra activities can happen. These can be configured on your package’s command line, allowing you to assign player roles or send messages in-chat. Although, custom variables may have to be created beforehand. Other features might also have preparations, so we encourage you to reach out to the Tebex Support team if you have any questions.
Withdrawing Money
Once you’ve made some sales on your Tebex integrated game server, you can withdraw them into your bank or PayPal account. This is an important part of this service, as you and others alike want to make money. Fortunately, this process is easy and quick once funds become available. The steps below show you how to do this process.
- Head towards your
Dashboardand clickPayments, then pressWalleton the left.
- Afterward, login with your Tebex account credentials on the new page.
- Create a wallet by filling out the requested payout information.
- Later on, click the
Withdrawbutton at the top right corner.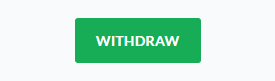
- Add or choose an existing
Payout Method, then enter yourAmountin the text box.
- When you’re finished, press
Request Withdrawat the bottom of this page.
- An email should appear in your inbox after a period of time regarding this withdrawal.
Common Issues
If you’re unable to locate the Monetization button on your server panel, then this means your game doesn’t currently support this feature. However, a manual installation and setup might work depending on Tebex’s compatibility. With this in mind, navigate to your Dashboard and click Your Account, then Webstores. After this, press Create Webstore and continue following the instructions to monetize your server. Remember, contacting the Tebex Support team is encouraged if you’re having trouble with this process. Although, encountering this situation on Minecraft may be caused by an unforeseen issue with our system. This means you should reach out to our Support team so they can help you.
After creating your package and it fails to execute its commands, then double check you’ve used correct variables. For example, {username} is used to grab the player’s name for the action. These values can be found in the Variables list while creating or editing a package. Remember, these commands are executed by Tebex on your Minecraft server, so they have to be correctly entered. This is amplified if you’re using plugins or mods that have custom ones, meaning you have to make sure no errors, typos, or anything else is present. However, other causes for packages to not work is failing to connect them on your Minecraft server or having the wrong visibility selected, among other possible issues.
Once you’ve received and withdrawn money in your Tebex Wallet, wait a few days to see if it sends it successfully. This process may take some time, especially if you’re still waiting for the balance to process after a player purchases a package. In some cases, this may take 3-30 days for everything to work out. Most of the time, this won’t be too much of an issue. However, double checking your payout method(s) is heavily suggested since any problem with them can result in a failed withdrawal. Similar to other issues with Tebex services, it’s encouraged to contact their Support team for assistance.
Useful Links
Official Tebex Website
Tebex Support Team
Apex Hosting Minecraft Guides
How to Add Plugins to a Minecraft Server


