


The Weather, Storms & Tornadoes mod for Minecraft brings dynamic atmospheric events to your world — from rolling hailstorms and blinding sandstorms to full-scale tornadoes that tear through the landscape. If surviving standard Minecraft feels too easy, this mod layers in real environmental danger. You and your players will need to read the sky, find shelter, and plan structures that can withstand what the weather throws at you. This guide covers everything from downloading and installing the mod to configuring it on your Minecraft server.
How to Download
The mod is available on CurseForge and supports Minecraft 1.20.1 and 1.21.1. The current stable release is version 2.8.6 for NeoForge 1.21.1. Forge builds are available for 1.20.1 and earlier. There is no Fabric version.
You also need CoroUtil, the required dependency library that powers the mod’s systems.
- Navigate to Weather, Storms, and Tornadoes on CurseForge.

- Click Files near the top of the page.
- Scroll down and find the file matching your Game Version and mod loader (NeoForge or Forge).
- Press the three vertical dots to the right of that file and click Download File.

- Save the downloaded file somewhere easy to find on your computer.
- Repeat steps 1–4 for CoroUtil on CurseForge — download the matching version and loader.
Client Installation
Before launching the mod in-game, you need NeoForge or Forge installed on your Minecraft launcher. Choose the loader that matches your server version. Once your modded profile is set up, follow these steps to add the files.
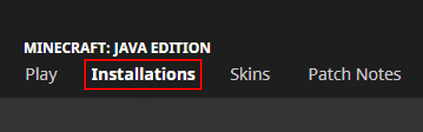
- Open your Minecraft launcher and click Installations near the top.
- Locate your NeoForge or Forge profile and click its Folder icon.

- In the folder that opens, find and enter the mods directory. If it does not exist, create it before continuing.
- Drag and drop both downloaded files — the Weather, Storms & Tornadoes jar and the CoroUtil jar — into this folder.

- Return to the launcher, select your modded profile, and click Play.
Server Installation
Your Minecraft server needs to run NeoForge or Forge on the same version as your client installation. You can set the server’s game file from the main panel, then restart to generate the mod folders. Once ready, upload both files through FTP.
- Go to your Apex server panel and click FTP File Access near the top left.

- Enter your Password in the text box and press Login.

- Open the mods directory from the file list, then click Upload in the top left corner.
- Drag and drop both the Weather, Storms & Tornadoes jar and the CoroUtil jar into the upload area.

- Wait for both files to reach 100%, then return to the main panel and Restart the server.
Modbox Installation
As an alternative to the manual installation, you can install Weather, Storms & Tornadoes on your server using Modbox, our built-in mod browser with direct CurseForge integration.
- Log in to your Apex Hosting account and open your Minecraft server panel.
- On the left side, select
Server Configuration > Modbox.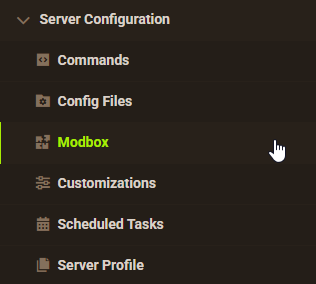
- Search for the mod you want and open its mod page.

- Select the recommended version for your server, then click
Install.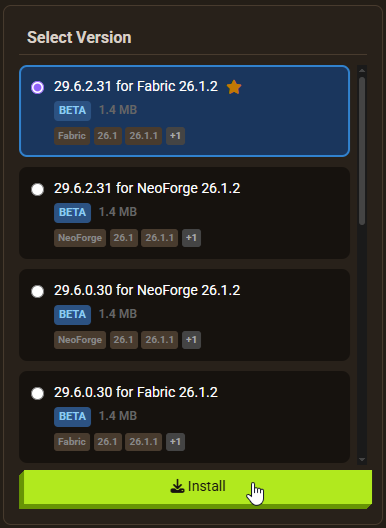
Note: Modbox automatically matches mods to your server's installed version, but does not install dependencies automatically. For more details on using Modbox, check out our full Modbox guide.
Weather, Storms & Tornadoes requires the CoroUtil dependency mod to function. Search for and install it individually through Modbox using the steps above, before installing Weather, Storms & Tornadoes itself.
Getting Started

After joining the server, the first thing you notice is the sky. Default Minecraft clouds are replaced with animated formations that shift in real time. Wind gusts pass through the world periodically, even on calm days. These are early signs that the weather system is active.
The longer you play, the more the environment responds. A clear sky can turn overcast within minutes. Clouds thicken, winds pick up, and storms develop based on the biome you are in. Pay attention to these changes — they signal what is coming. You can also explore other Minecraft mods on Apex that complement this kind of survival-focused gameplay.
Weather Indication
Animated clouds replace the static default clouds throughout the world. They appear in varying sizes and shades from white to deep grey. Their formation pattern is the main indicator of incoming weather.

Scattered clouds across a wide sky are not a concern. When you see clouds pulling together and stacking into a larger mass, a weather event is likely forming. Wind speed and direction also shift during this period — even smoke from fires bends and disperses as winds increase.
Not every buildup leads to a storm. Some events pass without escalating. But ignoring these signals puts you at risk when one does develop.
Multiple Storms

Once cloud density reaches a threshold, a storm can form near players. The type of storm depends on the biome.
Hail storms occur near snowy plains biomes. Large, hardened precipitation falls with a distinct sky change and more frequent lightning strikes. The hail itself does not directly damage players or break blocks, but lightning can. A struck tree can start a fire, and any player hit takes damage. Stay alert to lightning when hail is falling.
Sandstorms appear only in large desert biomes — not on beaches or small desert patches. When one starts, visibility drops sharply. Particles fill the air, and tumbleweeds and loose sticks scatter across the ground. These objects do not hurt players, and the storm cannot break blocks. It is disorienting more than dangerous, though building or mining during one is not practical.

Snowstorms happen in snowy biomes — mountains, plains, and similar cold environments. Visibility falls, particles bombard the screen, and lightning frequency rises. The added lightning chance means fires and player damage are both possible. Most snowstorms pass without escalating, but some develop into severe events that are worth avoiding entirely.

Powerful Tornadoes
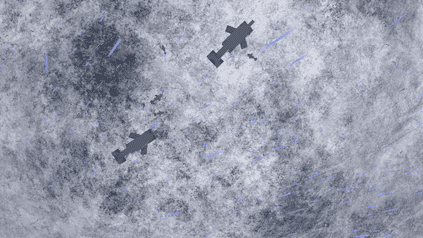
Tornadoes form when wind speed climbs sharply and clouds converge on a single point. The process is gradual — a funnel begins to drop over water or land, condensing tighter as winds increase. Over time the funnel grows, touches down, and begins moving across the world.

Everything in the tornado’s path is affected. Blocks are torn up, mobs are flung into the air, and players caught in the pull can be lifted off the ground. Having elytras on hand gives you a fast escape route, though the approach can still be terrifying.

If you cannot escape in time, the damage is severe. Trees come down, structures are demolished, and debris scatters across the surrounding area. Underground bases survive the destruction above, but players caught in the open or inside surface buildings are not safe. Anyone lifted by the tornado will fall once it passes — likely dying from the drop.
The rarest weather event in the mod is the sharkNado — a tornado made up of flying sharks. Because Minecraft does not have sharks, dolphins are used as stand-ins and get launched toward players. These form over oceans but can push inland. They are highly dangerous and should be avoided, though they scatter raw fish across the area they hit.
Weather Commands
Server operators can trigger or clear weather events directly instead of waiting for them to occur naturally. Commands run from the in-game chat or the server console, and require operator permissions to use.
| Command | Description |
|---|---|
| /weather2 debug [arg] | Shows storm chances or lists active weather events. Use storm_chance or print_grab_list as args. |
| /weather2 kill_all_storms | Removes all active weather events from the world. |
| /weather2 summon [type] | Summons a specific weather event at your location. |
| /weather2 wind_angle [value] | Sets the wind angle, maximum value 359. |
| /weather2 wind_event [clear / high / low] | Adjusts how wind events behave in the world. |
| /weather2 wind_speed [value] | Changes wind speed, maximum value 1.5. |
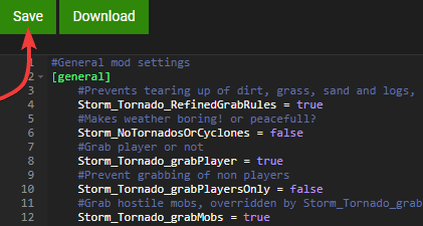
Mod Configuration
The mod ships with TOML configuration files that control how each weather system behaves. These are organised into categories: Foliage, Misc, Particle, Sand, Snow, Storm, Tornado, and Wind. Changes here let you tune whether tornadoes pick up players, adjust particle density, and more.
You can edit these files directly through the Apex panel’s built-in FTP editor.
- Click FTP File Access in your Apex panel and log in with your credentials.

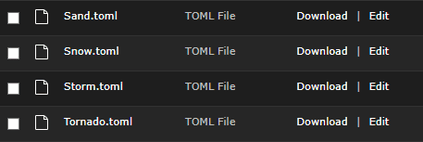
- Navigate to the following path:
.../config/Weather2 - Find the configuration file you want to change, then click Edit to its right.
- Make your changes in the editor and click Save at the top.
- Return to the main panel and Restart the server to apply the changes.
Common Issues
Unable to Join the Server
If you cannot connect after installing the mod, check that you have selected the correct modded profile in the Minecraft launcher — it must be the NeoForge or Forge profile with both mod files in its mods folder. The server must also have both files installed on the correct NeoForge or Forge version. Mismatched versions between client and server are the most common cause of connection failures.
Unexpected Error Occurred
Command errors and internal crashes are more common on beta or alpha builds. Switching to a current Release build typically resolves stability issues. Also confirm that the CoroUtil version matches the Weather, Storms & Tornadoes version you installed — a mismatch between the two causes errors.
Flying Is Not Enabled
Tornadoes can lift players into the air, which triggers the server’s anti-fly check and kicks them. To fix this, go to Config Files in your panel, open Server Settings, and locate the Allow Flight option. Set it to Enabled, click Save, and restart the server. Players will no longer be kicked for being airborne during a tornado.


