


Overview
Alright gamers, you didn’t click on this for no reason. You want to know how to master the art of brewery and potioncraft in hopes of empowering yourself. Whether it be for PvP, utility, or just fun, I’ll help you figure the best way to acquire some awesome potions! Now, let’s get started.
The Brewery
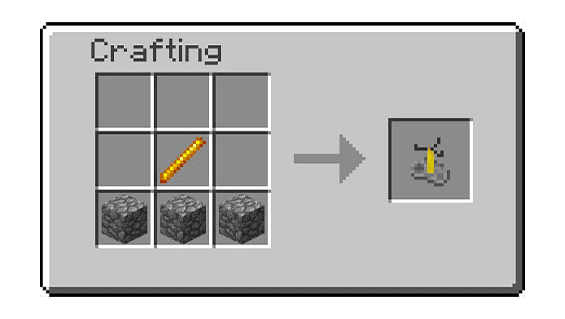
This is what you’ll need to start making potions. You can find these in Villagers, or craft them yourself with 3 Cobblestone, and 1 Blaze Rod. You can also find potions, but if you planned on doing that, you wouldn’t be reading this.

This is the UI of the Brewing Stand. To get started, you’ll need to fuel the Brewing Stand with Blaze Powder. Next, place the corresponding ingredients in the top middle slot. The slots that have a Bottle outline will be where you place Bottles of Water, which will eventually transform into the potions. Only one ingredient is needed to brew three potions.
Potionography

 Alright Edward Elric, let’s get started on your Alchemical journey! This is gonna be tough, but you’ll do fine. First things first, you’re going to need to make some glass bottles. 3 Glass oughta do it. To brew potions, you need to fill these bottles with water by right-clicking a water source. Any water source block will do.
One thing you’ll need to get used to in Alchemy is the idea of transmutation. Basically, turning one thing into another. To create any potion effective potion you’ll need to make an Awkward Potion. (Potion of Weakness is the only exception) This is done by using Nether Wart as an ingredient on water bottles in the Brewing Stand. Once the Awkward Potion is created, different ingredients can be added to manifest different effects. That’s it! You’re an alchemist!
Each and Every…
Here I will list off each and every potion along with its effect, and how to make them. Here we go!

Allows you to see clearly in the dark
Brew: Awkward Potion + Golden Carrot

Makes you invisible
Brew: Potion of Night Vision + Fermented Spider Eye

You can fly!? No, jump good!
Brew: Awkward Potion + Rabbit’s Foot

Makes you immune to fire damage
Brew: Awkward Potion + Magma Cream

Increased speed and FOV
Brew: Awkward Potion + Sugar

Slower speed and smaller FOV
Brew: Potion of Fire Resistance + Fermented Spider Eye
OR Potion of Swiftness + Fermented Spider Eye
OR Potion of Leaping + Fermented Spider Eye

Instantly heal some hearts
Brew: Awkward Potion + Glistening Melon

Gives you more breathing time underwater
Brew: Awkward Potion + Pufferfish

Poisons the target, dealing damage slowly over time
Brew: Awkward Potion + Spider Eye

Instantly deal some damage
Brew: Potion of Healing + Fermented Spider Eye
OR Potion of Poison + Fermented Spider Eye
OR Potion of Water Breathing + Fermented Spider Eye

Gives Regeneration, healing hearts over time
Brew: Awkward Potion + Ghast Tear

Deal increased melee damage
Brew: Awkward Potion + Blaze Powder

Deal decreased melee damage
Brew: Water Bottle + Fermented Spider Eye
OR Awkward Potion + Fermented Spider Eye
OR Potion of Regeneration + Fermented Spider Eye
OR Potion of Strength + Fermented Spider Eye

Significantly decreases fall speed and negates fall damage
Brew: Awkward Potion + Phantom Membrane

Applies slowness and resistance. Note that upgrading Potion of the Turtle Master gives more resistance, but also more slowness
Brew: Awkward Potion + Turtle Shell

Increases luck, which increases the chances of finding higher quality items in chests
Brew: N/A This item is only unobtainable in Survival
Potioneering
Potions typically trigger status effects on the player/mob affected. Whether it be Regeneration, Poison, or even something as silly as Leaping, it will be a timed status effect. Inside of the inventory, you can read all status effects and see how much longer they have on the duration in the form of a timer. Outside of the inventory, you can see small status symbols on the top right of your screen. They will start to blink when the duration of the effect is close to wearing off. All status effects, bad and good, can be cleansed by drinking a Bucket of Milk.


All potions work similarly. They cannot be stacked on top of one another in your inventory (even similar potions) and take three seconds to drink. If you do not finish the full animation, you will not receive the effects of the potion.
Potionology
After you’ve created your potions, you can upgrade them in one of two different ways: duration, and level. This is done with Redstone Dust or Glowstone Dust. If you upgrade the level, you cannot upgrade the duration and vice versa. Some potions can only have their duration upgraded, as shown in the graph above.


Redstone Dust – Extends the duration of the potion by over 200%
Glowstone Dust – Intensifies the potion’s effects, but decreases the duration by 50%
Potionography
I would say the main reason we use potions in Minecraft is to kill someone or something. Let’s be real. Hitting twice as hard or making the enemy move slower is pretty useful. Whether it be a player or a mob, there are multiple ways you can utilize these potions. Sadly, politely asking your enemy to drink the Potion of Harming II typically does not work. This is where Splash and Lingering potions come in. Here’s how they work.
Takes 3 seconds to drink, only affects one individual.

By using gunpowder as an ingredient, any potion can be turned into a Splash Potion. This makes any potion undrinkable, but turns it into a throwable object that triggers the potion’s effects on anyone in the ‘splash zone’ of where it lands. This allows the application of potions to be much quicker, and can be used to apply the effect to everyone in your group. (save on potions) This can also be a great tactic in PvP, by throwing negative potions at the enemy.

By using Dragon’s Breath as an ingredient, any potion can be turned into a Lingering Potion. This acts like a Splash Potion, but particles will ‘linger’ and affect any mob or player that touches the area affected. The lingering particles will eventually dissipate.
To acquire Dragon’s Breath, you just need to right-click the Dragonbreath particles the Ender Dragon leaves behind when he attacks the ground.

Conclusion
Wooh! That was quite a lot of information to gulp down, but I think it’ll digest properly. Potions are a pretty complex part of Minecraft, but it can really feel fulfilling to empower yourself with the arts of Alchemy. From strengthening your blade, to literally becoming invisible, there are plenty of ways to enjoy potions! With that said, have a great day!


