Overview
Players who want to brew drinks and stagger around drunk can do both with the Brewery plugin. This guide uses BreweryX, the actively maintained fork of Brewery.
Players make many different drinks, and most of them are alcoholic. Drunk players stagger, see less, and send garbled chat messages. If a player logs off while drunk, they may struggle to rejoin.
All of this is for fun, and you control how far it goes. You can switch off features that cause problems and edit the drinks. Our panel makes installation simple, and this Apex Hosting tutorial shows you how to install and use BreweryX on your Minecraft server.
Modbox Installation
IMPORTANT: Make sure to have Spigot or Paper selected in the Game File option on your server panel so plugins can work properly.
- Head towards your Apex server panel for the server.
- Navigate to
Server Configuration > Modboxon the left.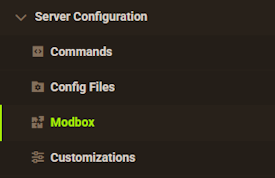
- Choose the version and search for the plugin you want, then select it.
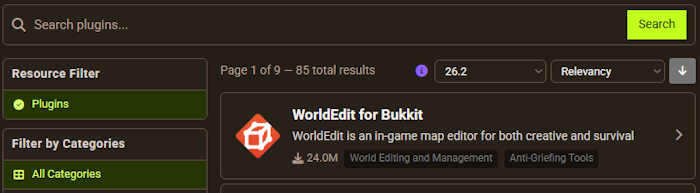
- Click
Installon the left and wait for it to be installed. - Restart the server to load the plugin. Repeat this process for any other plugins.
Manual Installation
Download BreweryX on Modrinth and follow these steps:
- Download the plugin file from the link above.
- Head towards your Apex server panel for the server.
- Locate the Game File option, then select Spigot or Paper if you haven't already.
- Navigate to
File Management > FTP File Accessand login. - Drag + drop the .jar file in the
pluginsdirectory. Alternative: Click theUploadbutton and select the file. - Wait for this to finish, then return to the main panel.
- Restart the server and the plugin should load properly once you join.
If the Brewery plugin already runs on your server, stop the server first. Delete the Brewery JAR file, but keep its data directory. Upload the BreweryX JAR to the
plugins directory and start the server. BreweryX migrates the data automatically.Getting Started

After joining the server, players collect basic and farming resources to start making drinks. Custom barrels and brewing stands let you age or distill drinks for the best results. Aging a drink too long spoils it, so timing matters.
You control the details. You can change any drink’s settings, create your own drinks, and edit chat messages and recipes. The subsections below cover what you need before you start.
Commands
Players can brew drinks by default, because the brewery.user permission is on for everyone. Admin commands such as create, set, and reload need permissions. Operators get brewery.admin by default. You can also assign permission nodes to users or groups with LuckPerms or a similar plugin. The table lists the most useful commands. It uses the default /brew alias.
| Command | Permission | Description |
|---|---|---|
/brew help |
N/A | Shows help for the plugin commands. |
/brew info [player] |
brewery.user, brewery.cmd.infoOther |
Shows your own drunkenness. Add a player name to see theirs, which needs brewery.cmd.infoOther. |
/brew create [recipe] |
brewery.cmd.create |
Creates a brew from a recipe. |
/brew puke |
brewery.cmd.puke |
Makes your character puke in-game. |
/brew wakeup add |
brewery.cmd.wakeup |
Adds a wakeup point. An admin sets these. |
| N/A | brewery.user |
On by default for everyone. Lets players create and open barrels, add ingredients to cauldrons, fill bottles from cauldrons, view cauldron time, and use /brew info. |
| N/A | brewery.mod |
Everything in brewery.user, plus brewery.cmd.wakeup and brewery.bypass.logindeny. Moderators can maintain wakeup points and log in even when overdrunk. |
| N/A | brewery.admin |
On by default for operators. Gives every command and most bypasses. |
Gathering Supplies
Most of the resources are common in the world, but gathering them takes time. Each recipe lists its own ingredients. Glowstone dust for distilling usually means a trip to the Nether.

Still, most of these items are easy to find.
Brewing Drinks
Once you have your resources, craft a cauldron, place it, and fill it with water. Then put a heat source under it. Fire, soul fire, lava, a magma block, a campfire, or a soul campfire all work. The default recipes page lists every ingredient.
Right-click the cauldron with each ingredient. For example, adding wheat to the water makes beer. New particle effects appear over the cauldron. Right-click the cauldron with a clock to see how long it has been brewing.

When the time is right, use three glass bottles on the cauldron to extract all of the contents. These starter drinks are drinkable, but some recipes need more work. Distilling, aging, or both lead to a higher quality level. Each drink may need its own process.

Doing a step wrong lowers the quality of the drink. Over-aging a drink, or using the wrong barrel wood, can spoil it.
Distilling
If your recipe needs distilling, place a brewing stand nearby. Put glowstone dust in the top ingredient slot. Place your drinks inside and wait until it finishes. Each distilling run takes 40 seconds by default, and each recipe sets how many runs it needs. When it finishes, a new drink appears.

Aging
Instead of distilling, you can age drinks in a barrel. Build a barrel by placing a sign with the text “Barrel” on a collection of blocks.

Barrels age drinks over time. One aging year equals one in-game day. Aging too long, or using the wrong type of wood, spoils the drink. Each recipe sets its aging in recipes.yml. This step takes the longest, because drinks need time to change into another type or reach a higher quality level.
Drunk Effects
After you make your drinks, try them out in-game. Drunk players stagger and see the effects of what they drank. Lower quality drinks have downsides, such as a hangover.

An action bar graph near your hotbar shows how drunk you are when you drink.
Chat messages change after you drink too much. Depending on how many drinks you had, your messages can become unrecognizable to others.

For example, typing “Can you read this?!” turns into garbled words. Everyone can tell when you are drunk, especially when you also stagger around.
If you log off while drunk, the server can deny your login when you rejoin. Players with brewery.bypass.logindeny can always log in. Switch off the enableLoginDisallow option in config.yml to disable this feature.

Types of Drinks
BreweryX lets you brew beer from wheat, or distill high-proof liquor and age it in barrels made of the wood the recipe names. It comes with default recipes, and they live in recipes.yml. You can change a drink’s settings in that file.

Custom Beverages
A custom drink can have its own commands, chat messages, effects, and more. Open recipes.yml in the panel editor to make one. The Plugin Configuration section below shows how to open the file.

Wakeup Points
If a player rejoins after drinking too much, they may wake up somewhere else in the world. An admin sets these wakeup points with /brew wakeup add. The enableWake option is on by default. BreweryX picks two random wakeup points in the player’s world and sends the player to the nearest one.

Players can also wake at /home after excessive drinking. This needs a plugin that provides the /home command. The enableHome option is on by default.
Plugin Configuration
To change settings, open the config.yml file in the FTP panel. It holds options such as whether puking is available. Drinks live in a separate file named recipes.yml. Our panel has a built-in editor, so you need no downloads or external programs. The official documentation has more information on the default recipes. Follow the steps below to open a file.
- Navigate to the
FTP File Accessarea and login with your credentials accordingly.
- Proceed to enter the following directory pathway:
.../plugins/BreweryX - Afterward, locate and press
Editon the right for the config.yml file, or recipes.yml for drinks.
- Make any necessary changes in the editor, then click
Saveat the top.
- Return to the main panel and
Restartthe server to apply these edits.
Common Issues
Unable to Brew Drinks
Players can brew by default with brewery.user. If brewing fails, check that a permissions plugin did not remove brewery.user from the player or group. Next, check for a heat source under the cauldron. Brewing does not work without one. If both are fine, the plugin may not be loading. Operators and LuckPerms matter for admin commands such as create, set, and reload.
Inability to Use Commands
If commands fail with the correct permissions, head towards the main server panel. Double-check that you selected Spigot, Paper, Purpur, or another type that supports plugins. Plugins do not load without one. Then check the installation. Upload the file to the plugins folder from the FTP panel and wait for it to reach 100%. Restart the server to load it. After this, commands should work in chat with their arguments.
Cannot Create Custom Drinks
Custom drinks need an exact format in recipes.yml. If you remove a character or value by mistake, the file can break and the drink fails. Fix the entry, then click Save near the top of the file editor. Restart the server from the main panel to load your changes.