Overview
Your Valheim server holds hours of exploration, base building, and hard-won fights, and none of that stays safe unless a copy of it lives somewhere else too. Server hardware can fail, and having your own copy on hand gives you extra peace of mind. Maybe you want a backup before a big fight with Bonemass, maybe you are moving your world to a new Valheim server, or maybe you just want to keep playing the same world alone after adventuring with other players. Whatever the reason, downloading a Valheim server world takes only a handful of files and a few minutes inside the Apex FTP client. This guide covers finding your world’s name, downloading the save files, switching to an external FTP client when the panel download will not cooperate, and importing the save into singleplayer.
Locating Your World Name
Before you can download the right files, you need to know exactly which world you are looking for.
- Head towards your Apex server panel and open your server’s Overview page.
- Scroll down to the World field. This shows your server’s current world name, such as valheim_4035555, with a Change World button beneath it.

Double-check the name matches what you expect before moving on. Every save file in the next section starts with this exact name, and mixing up two similarly named worlds is the easiest way to download the wrong one and waste a download.
Downloading Your World Files
Every world your server has hosted lives in one folder, saved as a set of files that all share the world’s name.
- In the left-hand menu, open FTP File Access.
- Locate and expand the
worlds_localfolder in the file tree.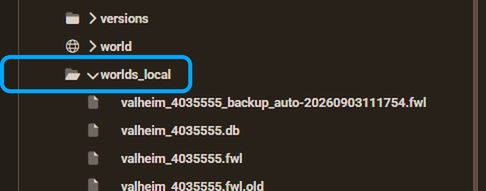
- Match the files against the world name you noted in the last step. A
.dbfile holds the terrain and structures, and a.fwlfile stores world metadata. You will also see a.fwl.oldfile and one or more timestamped files such asvalheim_4035555_backup_auto_202609031117.fwl; grab these alongside the.dband.fwlfiles so your download is complete. - To download a single file, right-click it and select
Download. - To download several files together, hold Ctrl (Cmd on a Mac) and click each file you need so they are all selected, then right-click one of the selected files and choose
Compress. - Right-click the new archive file that appears and choose
Downloadto save it to your computer.
Compressing the files first bundles everything into one transfer instead of several, which is worth doing whenever you are grabbing more than a single file. Keep the download somewhere you can find it again on your computer, since you will need it for the import step later in this guide.
Downloading with an External FTP Client
A world with a long play history can grow large enough that the in-panel download stalls or times out, particularly on a slower connection. When that happens, connect to your server with an external FTP client instead. Apex covers the full setup in its guide on connecting to a server via FTP, and once you are connected, the same worlds_local folder and the same file names are exactly where you left them. An external client handles large transfers more reliably than a browser tab, since it can resume an interrupted download instead of starting over from zero.
Importing Your World into Singleplayer
Valheim’s own dedicated server documentation confirms LocalLow\IronGate\Valheim as the default save location on Windows, client-side and server-side alike, so this is the right folder whether you are setting up a server or your own game.
- On your own computer, press the Windows key and R together to open the Run prompt.
- Enter
%APPDATA%\..\LocalLowand press Enter. A file browser window opens inside your AppData folder. - Navigate to
IronGate\Valheim\worlds_local. - Extract the files from the archive you downloaded directly into this folder, keeping the original file names intact. The
.db,.fwl, and.fwl.oldfiles should carry over exactly as they appeared in theworlds_localfolder on your server, since Valheim reads the same file set locally. - Start Valheim. Your world appears in the world selection list, ready to play solo with your existing character and inventory.
Common Questions About Saving a Valheim World
Why Can I Not Download the World from the Panel?
If a world file will not download directly through the panel, check file size before assuming something is broken. Worlds with a long play history and several backup files are the most likely to run into this. Switch to an external FTP client, as covered above, and the transfer finishes without running into the same limits. If a download still refuses to complete, our 24/7 Support Team can take a closer look with you.
Why Is the worlds_local Folder Missing on My Computer?
If IronGate\Valheim does not contain a worlds_local folder yet, create the folder yourself and place your extracted world files inside it. This gives you a valid worlds_local folder to extract your downloaded save into, ready for Valheim to read the next time you start it.