


Worlds in Minecraft are not compatible between Bedrock and Java Edition by default, but you can convert bedrock to java using a free tool called Chunker. This guide walks through the full process: exporting your Bedrock world, converting it with the Chunker desktop app, and importing it into Java Edition singleplayer or a server. Whether you are switching platforms for access to mods, plugins, or just prefer the Java experience, the steps below cover everything you need.
Before you start: Chunker converts level data, blocks, biomes, tile entities, dimensions, containers, and in-game maps. It cannot transfer player inventories or entities such as mobs and named animals. Empty your inventory into chests before converting and note the coordinates of any important builds so you can find them after the switch.
Exporting a Singleplayer World
- Launch Minecraft Bedrock Edition on your device.
- From the world selection screen, press the Edit button for your world.

- A new page will open with your game settings.
- Scroll to the bottom of the page and press Export World.
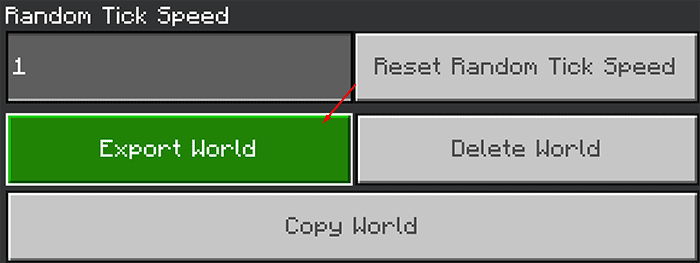
- In the prompt, save the .mcworld file to an accessible location on your computer.
Exporting a Bedrock Server World
- Navigate to your Apex server panel, then stop the server.
- Enter the FTP File Access and log in with your panel password.
- Open the worlds folder, then open your desired world folder.

- Select all of the files, then press Zip in the top-right corner.
- Once complete, select the new .zip file and rename it so the extension ends in .mcworld.

- Click the file name to download it to your computer.
Downloading and Installing Chunker
Chunker is a free, open-source desktop application maintained by Hive Games and funded by Mojang Studios. The web-based version was retired at the end of 2024. You will need to download the desktop app to convert your world.
- Go to the Chunker releases page on GitHub.
- Download the latest app version for your operating system (Windows, Mac, or Linux).
- Run the installer or extract the downloaded package to a location on your computer.
- Open the Chunker application.
Converting Your Bedrock World with Chunker
- With Chunker open, you will see the Upload World screen.
- Click Select archive and choose your exported .mcworld file. You can also drag and drop the file directly onto the Chunker window.

- After the world loads, Chunker will display the available output options.
- Select the Java Edition version you want to convert to.

- Click Convert to start the conversion process.
- When complete, click Save and choose a folder on your computer to save the converted world .zip file.
Importing into Java Edition Singleplayer
- Open the Minecraft Java Edition launcher.
- Navigate to Installations, highlight your version, then press the folder icon to open the game directory.

- In the window that opens, enter the saves folder.
- Create a new folder for your world.
- Extract the contents of the converted .zip into that folder.

You can now launch the game and play your converted world.
Importing into a Java Edition Server
- Using FTP Access, enter your server files.
- Create a new folder for your world, then open it.
- Press Upload in the top-left, then drag and drop your converted .zip file.

- Once uploaded, select the .zip and press Unzip.
- When extraction is complete, return to the main panel page.
- Scroll down to the Change World button and click it.

- Enter the exact name of the world folder you created, then follow the prompts to restart the server.
The server will start up with your converted world. You can now run your Bedrock Edition world on a Minecraft server, taking advantage of plugins and Java-exclusive server software. If you want to let Bedrock players connect to a Java server without converting any worlds, GeyserMC handles cross-edition connections as a plugin alternative.
Conclusion
Converting a Bedrock world to Java Edition takes a few steps but is straightforward with Chunker. Export your world, download the Chunker desktop app, run the conversion, then drop the files into your Java saves folder or server directory. Keep in mind that entities and player inventories will not carry over, so prepare accordingly before you start. For players interested in cross-platform play between editions, or those ready to move to a full Minecraft Bedrock server hosting setup instead, Apex Hosting has guides to help at every step.
Common Issues
The world is not appearing in singleplayer:
Open the world folder in your saves directory and confirm the level.dat file is in the root of that folder. If level.dat is inside a subfolder rather than directly in the world folder, Java Edition will not load it. If the world still does not appear, restart the game and scroll through the full world list.
The server is loading a new world after restarting:
If the server creates a blank world on restart, check that the world name in your server settings exactly matches the folder name you created via FTP. Any difference in spelling or capitalisation will cause the server to create a new folder instead of loading your converted world. Confirm all files extracted correctly from the .zip by browsing the folder in FTP File Access, then restart the server once more.
Chunker will not open or shows an error on startup:
Ensure you downloaded the correct version for your operating system from the GitHub releases page. The bundled app version does not require a separate Java installation. If you are on Mac and see a security warning, right-click the app and choose Open to bypass Gatekeeper on the first launch.


